

I'm sorry to say, I attempted this transfer 3 times. That's 3 times painting it, doing the transfer, failing, scraping and sanding it off, repainting, and trying again.
I FINALLY got it! I was beside myself with excitement when the last method I tried finally worked.
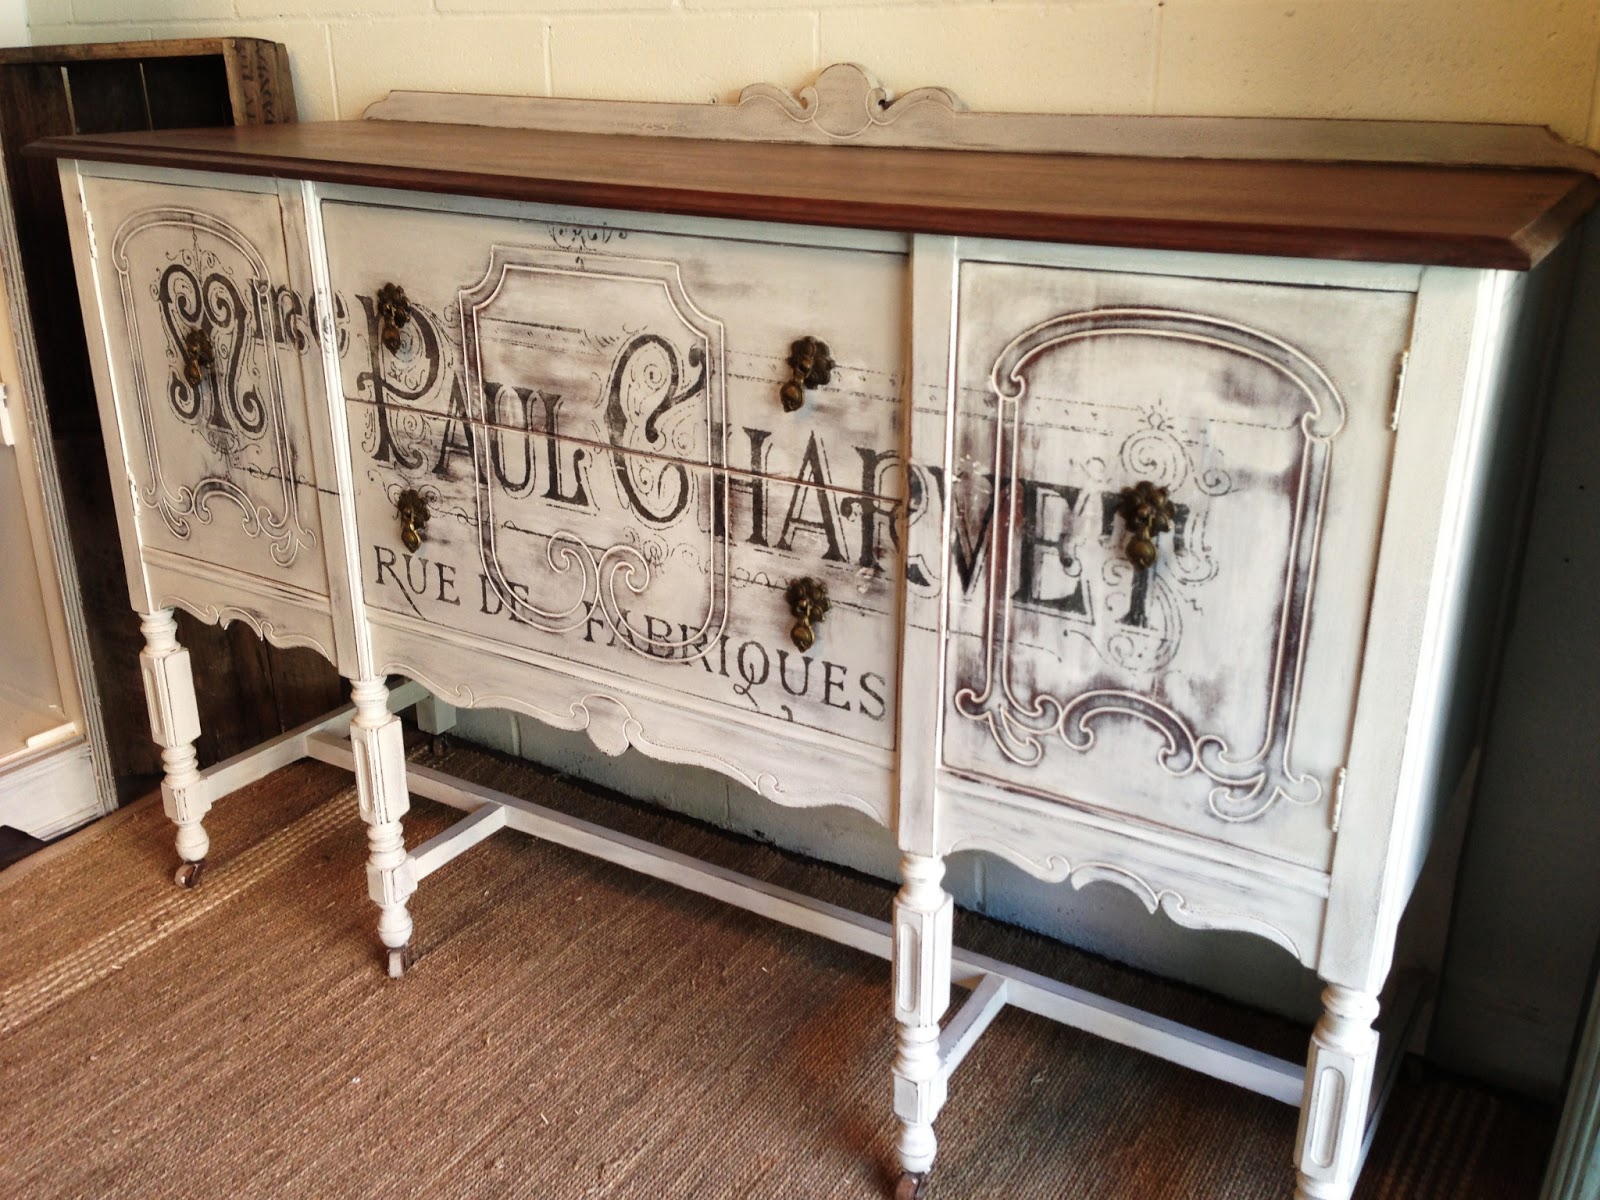
The image is from my newest favourite site: The Graphic's Fairy. Her images are large enough so you can expand them onto a piece this big, and they are 100% free to use and copyright-free too.

So French Chic.
I sanded down the top, and refinished it as well.

It was tricky working with the image in 8 different sheets, matching them all up perfectly, over the bumps and trim of the buffet.

I'm not a perfectionist. But when it comes to my furniture, perfectionist qualities are definitely pulled out. I'm guilty of obsessing just a bit over each piece I do, so it will come out just the way I envision it to.

Mark and I went backpacking this weekend, leaving the girls at Grandma's. I had been dying to check out this store called Simply Cottage in Bracebridge for months. I talked the hubs into making a (very out-of-the-way) pit stop before we hit the park. Here are some photos from this gorgeous store. You can visit their website here.
The shop was created out of an old foundry.

They carried the whole line of Annie Sloan's Chalk Paint, and offered workshops.

My favourite part, was in the back of the foundry, they had bits of architectural salvage - corbels, grates, columns, etc.

And a whole display of vintage tricycles. SO cute!

We were excited to be home again, though. My girls have become facinated with the front door - so if you come over and knock, you just may see them scurry to the door and peek through.


They just warm my heart!


Jen my friends had their wedding photos taken in Simply Cottage! Isn't it super cute?? Great job on the buffet..it looks absolutely stunning!!
ReplyDeleteA fantastic job on the buffet.
ReplyDeleteCan you share the method that worked best for you? Would love to try this!
ReplyDeleteHow do you get the sheets transferred onto the buffet?
ReplyDeleteTo transfer the image, simply print it out on a laser printer (I went to Staples and had them print it out for me in tile mode), then place the pages face down on the buffet, and simple rub the paper with varsol (paint thinner). Rub the graphic on using a blunt tool (such as the handles of a scissor). Very simple!
ReplyDeleteI used my projector, and hand painted the graphic, but I would love to be able to do a transfer. Try finding an engineering print shop that has an engineering sized printer, they may be able to print for you on 36" paper instead of 8 small sheets. That's what I have done, but I'm up in Thunder Bay, I only know of the shops here.
DeleteBeautiful buffet. You did a fantastic job. Thanks for sharing how you did the transfer. I did it a much harder way on an end table.
ReplyDeleteAbsolutely gorgeous!! I now have to find the right piece of furniture to try it on. Thank you for sharing this beautiful piece.
ReplyDeleteThank you, Jen!! My heart skipped a beat when I saw the buffet. It's just gorgeous.
ReplyDeleteJen, this buffet is to die for! It is so beautiful and inspiring. Still chicken it won't turn out for me, I will start with something small. Thanks for sharing. Love it!
ReplyDeleteJen, did you have Staples reverse the title copies then print it out for you? I have had several projects that I have done and did again and again until it came out just right. I love creating old things into fun new fresh pieces. I usually dream about a project and then do it. Thank you for sharing.
ReplyDeleteI got the image printed off in 'mirror' so it was flipped and reversed.
DeleteJen,
ReplyDeleteThank you so much for sharing your technique! Like you, I've attempted a transfer to my kitchen table no less than three times. At this pint, I'm more than willing to take the table out into the yard and set fire to it!!! I'm excited to try your version and hopefully I will spare the table :-)
Gorgeous! I'm definitely going to try Varsol. Thanks for sharing your secret, but I'm not sure I would have given it three tries. Way to go.
ReplyDeleteYour buffet is great, but doesn't compare to your cute little girls!
ReplyDeleteHi Jen; I'm new to all this furniture refinishing. We just bought a 'mid-century' cottage full of furniture and we're refinishing it to rent it out. (In Beaverton, south of Bracebridge). I have just finished my first DIY Chalk Painted side table. Turned out not bad IMHO. I have another dresser that I want to finish with French Topography similar to the one you did here. I have too been researching all the ways of transferring the graphic. I'm interested in hearing all the ways you tried and failed before doing the varsol method. I was considering the mod podge method, but this way looks very easy. Can it be an Ink Jet, or only a Laser Jet? Also, I found a good supply for Calcium Carbonate. $16.50 for a 50lb bag of Line Marking Powder from Home Hardware. http://www.homehardware.ca/en/rec/index.htm/Outdoor-Living/Sporting-Goods/Summer-Sports/Baseball/Accessories/50lb-Bag-Line-Marking-Powder/_/N-ntlft/R-I6810446. I used this for my dresser and although I have no frame of reference, it seemed really good to me.
ReplyDeleteHi Andrea, it's one of my dreams to buy a cottage in the Bracebridge area, and refurnish it with all painted cottage chic pieces! Maybe one day! The mod podge method was one of my failed attempts, I honestly wouldn't even bother if I was you. The glue left remnants on the piece, it yellowed for some reason, and all started peeling off. It was a terrible mess! I actually attempted it twice, and both times it ended in failure. The way I did it was much simpler. Just dip a rag in varsol, rub it on the paper, take a hard object and really rub the ink onto the piece. It takes a bit of grunt work, but you can peel back the paper to see how you're doing as you go. And it definitely turns out wwwaaaayyy nicer!
DeleteSaw your buffet on The Graphics Fairy! Absolutely gorgeous piece! Thank you for sharing.
ReplyDeleteYour piece is gorgeous. Absolutely love it. Thanks for sharing your technique and tips. How did you get the dark shadowing over the carved details? Did you dry brush the darker color? or something else? I think that adds a really nice finishing touch to the graphics.
ReplyDeleteThe darker shadow is achieved simply by sanding it down more in those areas. I know AS boasts that 'no sanding is required'.... but I find the finish is 1000 times more beautiful if it is sanded down! I use a very fine sand paper on a sander, then hand sand the detail.
DeleteHi Jen -
ReplyDeleteI tried Mod Podge & matte medium - 4x!!! I still had that paper shadow that I despise! Sanded it off again - you're method is def worth a try. Question though:
Were you able to seal the front with clear wax after you transferred? I've had problems with the ASloan was removing the ink.
And - do you think a laser printed transfer is better than ink? I'm thinking that's been my big problem with the ink too.
Last - did Staples print the transfer out for you at the store from the Graphics Fairy site?
Thank you! I know all this info helps all of us out. =0)
No problem! The clear wax went on like a charm after I did the transfer. You do have to really rub at the ink with a hard blunt tool quite a bit for the ink to transfer. When I went to Staples, I had a wonderful young girl who was so helpful. She said all the printers were laser printers (even though another associate told me it was ink jet)... so I'm pretty certain they were laser printed. Ask them to print on tile mode. They will come out on 11x14" pages. The young girl there knows me well enough now that she knows to just go directly to the graphics fairy website, but if there's another lady working there, I bring a USB with the file saved on it. If it's saved incorrectly, you can use their display computers there and go to the graphics fairy website and try saving it again. Usually they are pretty helpful!
DeleteThanks again for sharing this beautiful piece. I am new to re-inventing furniture and have an entire garage full of furniture to re-do, so when I find specially gifted people that are willing to share their talents, I am so thankful. I do have a question, where did the three background "frames" used on the three sections of the piece come from?
ReplyDeleteYou are an inspiration.
The 'frames' are actually ingrained in the wood and are a part of the buffet.
DeleteI so love this project, and I love that you kept at it. Now you know how to do it perfectly next time. Funny things in common, my husband is a Mark as well, I have twins, but they are boy/girl, and almost 12! And, we both love that buffet and that graphic. Featuring tomorrow at Redoux. Party starts at 5:00 EST. Thanks!
ReplyDeleteOh wow... What an honour! Thank you so much! That's really neat that you're married to a Mark as well and have twins. We have much in common :)
DeleteI just found you through Redoux. I swear it must be serendipity. I just transferred a couple images from the Graphics fairy onto a couple pieces, but I like your method a lot better. Also, I'm a twin mama too! Mine are 4 and (still driving me crazy). I'm your newest follower.
ReplyDeleteI LOVE meeting other twin Moms! I love you blog, it's so fun! Your boys are beautiful.
DeleteHi Jen,
ReplyDeleteI am also new to upcycling furniture, but I have fallen in love with it! I bought 2 end tables that I want to add a French cottage type graphic to. However, I want to paint them gray or an antique blue and add the graphic in white. Do you have any suggestions on how I could do that? Thanks!
I haven't tried transferring a different colour - but I'd love to give it a go. If you do it, let me know how it goes!
DeleteJen, You did an amazing job on this buffet. Especially since I think I spied twins somewhere in the background. I love that you extended the image across the front. I find I limit myself to a smaller area. You have inspired me. My first time with a transfer I also painted and re-painted. Great Work, Katie
ReplyDeleteDon't know about you all in the States, but in my state of S.C. Varsol is only available to professional dry cleaners, and of course they are not supposed to sell it to us customers. I guess you'd have to strike a deal with some small town guy/gal, or better yet, tell them what you want with it, and they'd feel better about selling it to you. Varsol is the cleaning liquid that dry cleaners use to clean our clothing. I used it once for getting out gutta , a latex resist used in silk painting. Dyers told me that gasoline would work for the same purpose, but of course, the fumes, the fumes!! Definitely not good for you or the environment...that said, we used lighter fluid in Art School to do a few transfers onto paper from magazines. Some worked better than others, you'd have to depend on trial and error. You can always use the tried and true carbon paper method: You will have to get the image as large as you need it. Then go buy some carbon tracing paper from an art supply store, or make your own with a pencil, but it would take forever with an image this size. Use the carbon tracing paper just as the waitresses did with old-fashioned carbon paper. You will then have to handpaint the image. Very low-tech, and time consuming, but no fumes!
ReplyDeleteI didn't know that! Here in Canada you can buy varsol at any hardware store.
DeleteHI! TELL ME PLEASE WHAT IS "CHALK PAINT"? IT'S LIKE SIMPLE COLOR FOR FURNITURE {WATTER BASED} OR WHAT? IT'S HAVE MAYBE OTHER NAME ALSO? EVA
ReplyDeleteIt's a paint created by Annie Sloan specifically designed for painting furniture. You can read more about it on her website at: http://www.anniesloan.com/acatalog/paints.html
DeleteLove your work Jen! I use American Paint Company Chalk & Mineral paint (all natural and very low odor) and love it. I just got done testing a transfer method using Omni Gel (also low odor). The graphic was color and of course I got it from The Graphics Fairy! My test piece came out great! I know what I'll be doing this weekend!
ReplyDelete-Jenny
Hi Jen, greetings from south of Owen Sound! Which brand of wax did you use to cover your piece? It is gorgeous! I want to make a clock. It will be painted using Annie Sloan chalk paint, and I'd like to transfer an image onto the face, the same way you did. Staples is an hour away for me for a laser print job. Do you think my inkjet would work?
ReplyDelete